In this topic Hide
A research output profile allows you to define aspects of the data you are importing using the Research Outputs Feeder. It allows you to define the headers, the fields to use as categories, and map the source categories and fields to RME.
Menu path: RME > Integrations > Research Outputs Feeder Service > Research Output Profile
The process to set up a profile for use in the Research Output Feeder Service involves the following key stages:
• Create a file that replicates the exact headers for the columns of data you want to import from the source.
• Create a new profile, uploading the file created in the previous stage.
• Specify the column in the source file that contains categories and map these to RME categories.
• Define mapping from source file column headers to RME fields.
• Save the profile.
Also see: Research Outputs Feeder technical details
Create a file that replicates the exact headers for the columns of data
you want to import from the source.
Format: CSV file or a tab delimited file, no
bigger than 200 KB, with a minimum of 4 and a maximum of 100 columns.
No naming restrictions.
Only the headers of this file are used
in feeder configuration to specify the column that will contain categories
in the source file in stage 2, and populate the list for field mapping
in stage 4.
In preparation for stage 3, you will also need to identify the exact categories from the source that you will enter for category mapping.
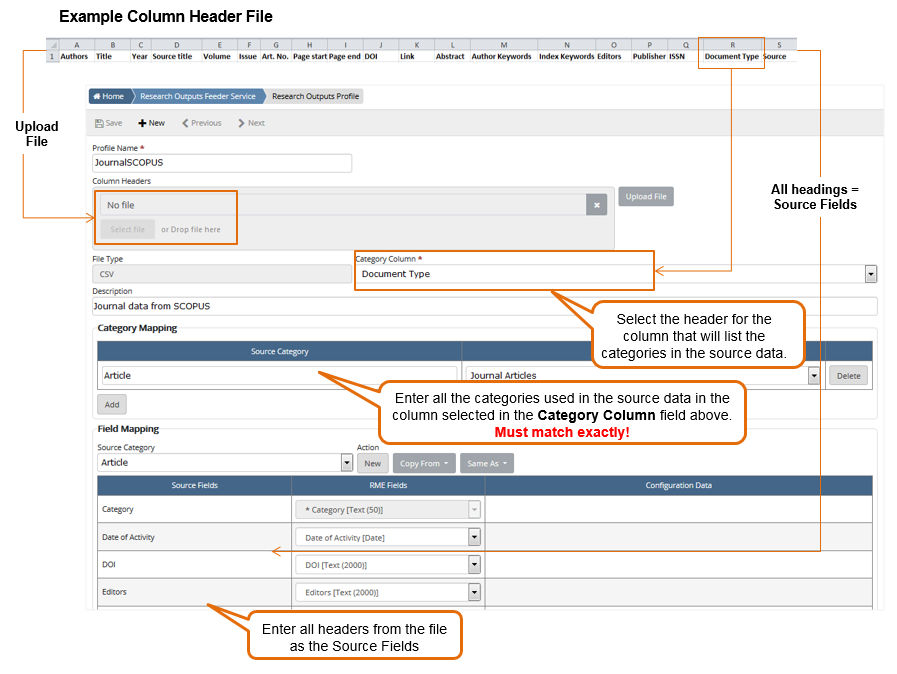
Click to view or hide: Example header file and relationship to mapping defined in the profile
Set up a new profile on the Research Outputs Profile page by completing the following fields:
Field Label |
Description |
Profile Name * |
Mandatory Distinctive name for the profile to easily identify it • Ideally, you create a profile for each source of research output data however you can have as many as you need. • The name must be unique; you cannot have two profiles of the same name. • The name must exactly match the folder name you set up in the network location for source files. |
Column Headers * |
Mandatory Use this field to upload the file you created in step 1 with headings that match the source data you want to import. It must be either a CSV file or a tab delimited file, up to 200 KB. If antivirus scanning is enabled in System Preferences, the file will only be uploaded if it passes the scan. Once you save, you cannot upload a new file.
Try before saving Before you save, you can upload a new file to add or change header information to match your source data. Field changes are indicated on the Field Mapping tab by icons in the Status column. Once you save, you will not be able to change this header file. For more about documents, see: Document upload and management and System Preferences, Linked Document Settings. |
File Type |
Read only Type of file based on the file you uploaded |
Category Column * |
Mandatory This dropdown is populated when you upload a Column Headers file. The first column of your file is selected by default. Select the specific column header for the data that you want to use for category mapping, for example Document Type. You will need to enter the actual categories used in your source data in the Category Mapping tab below. |
Description |
Describe the profile to help distinguish it from others and add any special notes about what the profile is used for.
|
In the Category Mapping tab, click Add
and manually create the research output categories used in the source
data, and then map them to the RME research output categories.
If you want to delete a category mapping, just click the cross
X to the right of the line.
Field |
Description |
Source Category |
Enter the source category manually
It must match exactly to the source data category or it may fail to import. You can only use a Source Category once. |
RME Category |
Select the RME category to map to the source category You can map two different source categories to a single RME research output category. Format: eCode : Category Name : Year Example: A1: Books - Authored 2012 - 2023
The Year portion is sourced from the category configuration; it can show the range as From year - To year, or just one year if either From or To field is blank. |
Status |
Indicates if the recent field mapping could not be saved successfully |
![]() There is no auto-save
when you enter details; validation processes run when details are saved.
There is no auto-save
when you enter details; validation processes run when details are saved.
You can go to the Field
Mapping tab or other fields on the page, but
do not click Close
or leave the page or you risk losing your work.
The Field Mapping tab automatically lists the column headings from the Column Headers file you uploaded for each source category. In the RME Fields column, manually map each one to an RME field, then click Save. You need to map fields for each source category that you defined on the Category Mapping tab. The table below explains the mapping columns in this tab.
![]() Time saver tip: When you save at least one source category and field mapping,
you can copy or mirror field mapping using action
buttons.
Time saver tip: When you save at least one source category and field mapping,
you can copy or mirror field mapping using action
buttons.
The table below explains the actio buttons in the Field Mapping tab.
Action button |
Description |
New |
Define new mappings manually; it clears any previous mappings |
Copy From |
Copy the existing field mapping of a source category and edit to suit Use the dropdown to select the category you want to copy.
|
Same As |
Mirror the existing field mapping of a source category and reflect any future changes in both Use the dropdown to select the category you want to mirror.
|
When you click Save, the details entered are validated. The Column Headers field is greyed out.
If there are any problems, notifications will display. For example, if mandatory fields were not mapped, a notification displays.
In the Category Mapping tab, if some fields were not successfully validated or saved, an exclamation icon is shown under Status for the impacted Source Category.
When a profile file is uploaded for this feeder, field-level details can be viewed from RME > System > Documentation > Feeder Service > Research Outputs Feeder (or customised name).
If you want to change details for a research output profile that you have saved, click the profile entry in the grid on the Research Output Feeder Service page to display the details.
Be aware that if you make changes and saving the profile, previously saved changes will be removed and replaced with the latest profile version. If any import tasks are running at the time for that profile, data inconsistencies may result.
You can only change the following for a saved profile:
Action |
Notes |
Edit the profile description |
|
Change or add a source category and mapping |
Source Categories must match source data exactly or it may fail to import. |
Change field mapping |
Mandatory fields must always be mapped. |
Change the column header defined in the Category Column |
Align the new header details with all mapping or it may fail to import. |
For extensive changes, consider creating a new profile. If you no longer wish to use an old profile, delete it to avoid confusion.
Product Key: Feeder - Research Outputs
Page ID: FDR016.htm