
In this topic Hide
This help page explains the layout for RME core record pages, such as a Project or Ethics record.
When you open a core record from search results, the layout comprises of a breadcrumb trail, core record toolbar, fields for the record, sections for specific types of information, and additional related items. Also see: General RME layout.
1. RME menu toggle: You can minimise the RME menu to make more space for the page by using the RME menu toggle. When collapsed, the menu is reduced to icons.
2. Breadcrumb trail: This sits at the very top of the page lets you know what page you are viewing, and the pages in the hierarchy that leads to that page. You can click on a page link in the breadcrumb to go to that page. When you open a related item of a core record, it will display the eCode, then the title (up to 55 characters then truncated) in the following core modules: AOU, Committee, Contracts, Ethics, Organisation, Facility, Fund Scheme, Panels, Projects, and Research Outputs. HDR and Personnel pages display the student or person's name. Other modules not mentioned will not display an eCode.
3. Core page toolbar: This toolbar above the core fields offers relevant actions for the type of page you are viewing and the actions assigned to you. For example, New allows you to create a new record if you have been given the page action to create new records. For details, see: Core page toolbar below.
4. Core record fields: The general fields for the record display beneath the toolbar. Date fields can be completed either manually or by using the date picker. Fields with Yes or No options are presented in a slider format; slide it to record your response. Groups of fields for specific types of information can be differentiated by a border within the page layout, for example Primary fields or Date fields.
5. Sections: Fields for specific uses are displayed in sections with a sub-header. These are expanded by default when you open a core record but you can collapse or expand as needed by clicking the arrow icon to the right of the section header.
6. Related items: These are accessed via tabs. To view summary information for a related item, click the tab. To view full details or edit an item, click the Open icon. The related item details will open in a new page. The most commonly used tabs are first.
7. Timeline: Graphic representation of Significant Events related to the record. This is only displayed for records with Significant Events (record pages for Projects, Ethics, Research Outputs, Contracts, Students, Personnel, Committees and Panels)
Click to view or hide: Example core page components
When viewing a core record, related item or sub-item, a toolbar across the top allows you to perform certain actions. When you scroll down on long pages, the toolbar will remain anchored to the top of the page so you can easily use the options.
Options change to suit what you are viewing. The table below lists all possible options.
Icon |
Label |
Description |
Used in ... |
 |
Audit Details |
Displays a popup with details about changes to the record including both who created it, and when, and who last changed it and when Note: This always displays regardless of audit settings in System Preferences or Table Auditing. |
Core record Related or sub-item |
 |
Batch |
Used to add a Significant Event to more than one record, usually by RME administrators The Batch page action must be assigned in each relevant Significant Event Page View (available for all modules). |
Significant Events |
 |
Category Definition |
Used to display details about the selected category in a popup, sourced from Research Outputs Categories, in order to help users decide which category to select |
Research Outputs record only |
 |
Category Guidelines |
Used to display either details about the selected category in a popup, or a web page for internal guidelines in the institution's website, depending on the configuration in Ethics Categories, in order to help users decide which category to select |
Ethics Specifics page only |
Copy |
Creates a copy of the selected record and allows you to select which related items you want to copy For more, see: Copy records and versions |
Core record |
|
New |
Allows you to create a new record or new related item |
Core record Related or sub-item |
|
Next |
If you have been assigned with the Allow Bulk Navigation page action for the page, you will be able to view the next record, or next entry in a sub-item.
|
Core record Some related items Sub-item, if more than one
|
|
 |
Open eForm |
Opens an associated eForm application in a new browser tab, depending on your workflow permissions and the current state of the eForm If the eForm application is in a workflow state that you cannot access, a message displays. This is usually because someone else is processing it. |
Core records: Projects, Ethics, Contracts, Research Outputs HDR Student: Enrolment & Progress related item for each course, sub-items for Examination, Extension, Leave, Progress Review Outcome, Scholarship and Study Mode Change Personnel related item: Supervisor Registration History |
Previous |
If you have been assigned with the Allow Bulk Navigation page action for the page, you will be able to view the previous record, or next entry in a sub-item.
|
Core record Some related items Sub-item, if more than one
|
|
 |
Costing and Pricing Tool |
This button displays if the Costing and Pricing Tool is used, you have access to the Project record, and the button is enabled for your role or user account. It will open the Costing and Pricing Tool (CPT) if used, or if the costing was generated originally in ReCaP, it will open ReCaP. This is the default label but it may be customised for your institution. |
Project core record |
Save |
Saves any changes made |
Core record Related or sub-item |
|
Send |
Used to send an email |
Related or sub-item with email fields |
When you save a new core record, related items become available to record additional details based on type.
To view summary details, click the related item. Summary details display in a grid. To view details of an item, click the link denoted by blue text in the first labelled column in the grid. For example, in a Project record, the Investigators related item summary grid lists all investigators recorded for the project. You select an item in the grid to open a new page with all the investigator's details. The summary grid is shown in the related item page to allow you to view other items.
In a related item page sometimes sub-items are available. For example, in the Investigators related item page, sub-items display for Investigator Org. Units and Investigator Contact Details. If the sub-item displays a grid, click the Open icon to open the sub-item details in a new page. If there is more than one item, you can move through them by using the Next and Previous buttons on the toolbar.
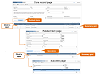
Click to view or hide: Example of the structure - core record, related item and sub-item
Document upload functionality is offered in relevant pages in core records, such as Document related items.
Task |
Steps |
Upload a document or enter document details |
The steps below are based on the default page layout: 1. In the Document type field, select the format for the document from the following options: • Soft Copy: To upload an online file, such as a PDF or Word document via an upload control. • Path: To enter a path for the document location in your institution's system or other accessible online location. • Hard Copy: To enter the document name of a hard-copy document
2. In the Doc. Category dropdown, select the relevant category grouping for the document, if relevant. 3. For the Restricted Access flag, indicate whether the document should only be visible in core related items for users with the View Restricted Documents permission assigned to their role. If document fields are included in an email, access will differ, as follows: • Soft Copy: Only the name of the document is provided in an email body; there is no link even if the Document Link field is included. • Path: The document path is included in the email body as a link. If the recipient has already been given access to the folder location, they will be able to access the document regardless of whether they can access documents in RME marked as Restricted Access. • Hard Copy: Only the name of the document is provided in an email body; there is no link for a hard-copy document. 4. Complete the Document field based on the format selected in step 1. • If Soft
Copy, click Select file to browse and upload the file (it may
be possible to save without being uploaded if the field is not
set as Mandatory in page). File formats, such as docx,
pdf, csv or xlsx, are set by your administrators. If you cannot
upload a particular type of document, contact your administrator
for assistance. 5. The mandatory Name field will be automatically populated from the Document field but can be edited. 6. For a path, the Document Path field is automatically populated from the Document field but can be edited. 7. For a soft copy if the storage type for documents is set as File System in System Preferences, the Document Full Path field is automatically populated from the Document field but can be edited. A unique identifier is automatically added to help distinguish between documents with the same name. 8. In the Description field, enter an explanation for the document or any comments to help others locate or use it. 9. Save the document. Notes: • The storage type, maximum file size and allowed file types are set in System Preferences. • If antivirus scanning is enabled in System Preferences, the file will only be uploaded if it passes the scan. |
Edit a document |
1. In the document grid, open the document you want to edit. The document details display. 2. Change the details. 3. If you want to upload a new soft copy document, remove the existing file first. To upload the new file, click Select file to browse and upload, or drag and drop it into the area marked Drop file here. 4. Save your changes. |
Delete a document |
To delete the entire document item, including all details and the linked document, follow these steps:
|
For multi-line text entry fields, a text editing toolbar offers a variety of editing and formatting options. For details, see: RME general layout - Text editing toolbar.
You can add new records, edit them, delete them and export details, depending on your access and permissions.
• Search
• Copy RME records and versions
ID: Core_page_layout.htm