Ethics Category Layout Designer
In this topic ShowHide
About this page
The Category Layout Designer is used to customise the layout or field
properties for an Ethics Specifics related item when a particular ethics
category is selected. Ethics category records are created in RME
> Ethics > Ethics Categories Search > Ethics Categories. The Category Layout Designer
works in the same way as the Page Layout Designer.
As a summary, you can select a field in the layout to change field properties.
To change the layout, drag-and-drop fields to add or remove them, change
the position, create sections or groups of fields, add, remove or reorder
tabs, or add a horizontal divider line.
Note that the Ethics Specifics related item is not used for the Biosafety
eForm template category.
Menu path: RME
menu > Ethics > Ethics Categories Search > Ethics Categories
> Layout Designer button
Prerequisites
• The product
key for the Page Layout Designer must be applied.
• It is advisable
that you should have some knowledge about web design principles and an
understanding of user experience design to avoid usability issues.
• This feature
is designed to be used on a PC. Due to the space required to view and
edit page layouts, it is not designed for tablets or mobile devices.
• You should
be familiar with RME Ethics module pages and ethics categories.
Configure field properties
The fields for the category are displayed in the current layout.
To change properties for a field:
1. In an Ethics
Category page, click the Layout Designer
button.
2. Click the
field in the layout to select it.
3. In the Properties
panel on the right, edit the field properties. Some system field properties
cannot be changed.
4. In the toolbar,
click Save.
If you want to change the grid settings for the fields in the Ethics
Category page, go to Page View Field for ETH005
and adjust the relevant field/s.
Properties: Fields (in order)
Customise a page layout
To customise a page layout:
1. In an Ethics
Category page, click the Layout Designer
button.
2. Select the
Use Custom Layout button on the
toolbar.
3. Drag-and-drop
items from the Design panel on the right into an empty space on the canvas,
or move items around. To remove
items, click the X in the
top corner of the item.
How
to drag-and-drop
• Click
an item, such as a field, to select it.
• Keep
holding the mouse-click while you drag the item into an empty space on
the canvas. As you hover over the canvas, dotted lines appear over the
spaces in which the item will be placed when you "drop" it.
You can only add or move an item to an empty space that will fit the default
size.
• Let
the click go to "drop" the field into position.
4. If adding
a group box, section or tab, click to select it. In the Properties panel
- Title field, enter a relevant
name to display in the page for the item.
5. To see how
the page will look, select the Preview
Layout button on the toolbar.
6. When you are
happy with your changes, select Save.
If the Page View is assigned to one or more roles, or has the highest
precedence, if more than one exists, it will be displayed to users. In
the Page Views search page, the Use Custom
... column is ticked to indicate that a custom layout is applied.
Click to view: Rules
Options in the Design panel (in order) include:
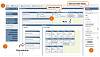
Layout of the Designer
The Layout Designer comprises of a toolbar across the top, the middle
"canvas", and a right panel for field properties. If licensed
and Use Custom Layout is enabled,
it also includes a left Design panel.
1. Toolbar
The toolbar provides some the following options:
2. Design
panel
The Design panel on the left is where you can drag fields, related items
and design elements into your layout. When you add a field or related
item, it no longer appears in this panel, to prevent duplication. To
collapse each list, click the header of the section. For more, see: Customise a page layout below.
3. Canvas
The canvas in the middle is the page layout. This is where you edit or
design a custom layout. To add a field, related item or visual element,
drag it from the Design panel into the canvas. You can also move these
around in the canvas by dragging-and-dropping. See: Customise
a page layout below. You also select a field to display the details
in the Properties panel on the right for editing.
4. Properties
panel
The Properties panel on the right displays the properties of a selected
field for editing. For more, see: Configure field
properties below.
You can toggle this panel to keep it open, or minimise it using the Pin
icon at the top right. This can be useful for allowing more screen space
when you're not using the panel. The panel is pinned open by default.
To minimise it, click the Pin icon. A Properties
button will display at the left of the page instead. Click this
button to open the panel temporarily; the pin icon will be shown on its
side. To pin the panel open permanently, click the Pin icon again so that
it is upright.
Click to show or hide:
Example Page Layout Designer (conceptual only; not ethics-specific)
Add a field
To add a field, drag-and-drop it from the Design panel. You can add
a field directly in the layout, or within a group box, section or tab.
• The
default size of a field is 3 spaces wide by 1 space high on the canvas.
• You
can add custom fields anywhere on the canvas.
• For
some Ethics Category fields, there are a few fields for different types
of input. Drag-and-drop the field with the type of input that suits your
needs.
Examples:
• Species
fields for Animal ethics: You can add these types of fields: a Species
Code (lookup), Species Name (read only), Species Detail (text entry) and
Species Numbers (text entry for a number value).
• Acquisition
fields for Animal ethics: You can add these types of fields: Acquisition
Code (lookup), Acquisition Date (date picker), Acquisition Short Desc.
(text entry)
Add a related item
To add a related item:
1. Drag-and-drop
it from the Design panel into a tab or section. You can choose which related
items and fields to display for the category in the Ethics Specifics page.
The options depend on the type of category.
2. If you want
to display a custom label for the related item on the page in place of
the default, click the related item to highlight and display the Title field in the Properties panel.
Enter a custom title.
• The
default size of a related item is 12 spaces wide by 1 space high on the
canvas.
• While
you can add a related item as a field directly on the layout or in a group
box, this is not ideal. In either case, the summary grid will display
on the page directly and cannot be collapsed. We recommend adding a related
item in either a tab (default) or in a collapsible section.
• If
a user has not been assigned the Page View for a related item, they will
not see it in the page. If there is a group box, section or set of tabs
containing only related items which the user has not been assigned, that
box, section or tab will not be displayed.
Add a group box
To add a group box with a border and title:
1. In the Design
panel, display the Other option
and drag-and-drop a Group Box into
an empty line.
2. Drag fields
or other items into the group box.
3. Click the
group box to highlight and display the Title
field in the Properties panel. Enter the title for the group box to display
on the page.
• The
default size of a group box is 3 spaces wide by 3 spaces high in the canvas.
You can change the width to suit.
• This
option is designed for grouping fields that are related or of a similar
type together. You can use it for other reasons and add related items,
and even sections, but you may find you need to adjust sizes for the best
look.
• You
can add more columns or rows by clicking the green plus + icon.
Add a section
To add a collapsible/expandable section with a title:
1. In the Design
panel, display the Other option
and drag-and-drop a Section into
an empty line.
2. Drag fields
or other items into the section.
3. Click the
section to highlight it and display the Title
field in the Properties panel. Enter a title for the section to display
on the page.
• The
default size of a section is 12 spaces wide by 3 spaces high in the canvas.
You can change the width to suit.
• You
can add more columns or rows by clicking the green plus + icon.
Add a tab
To add a tab:
1. In the Design
panel, display the Other option
and drag-and-drop a Tab into an
empty line.
2. Click
the Add tab within the tab and drag an item into it. If you want more
than one tab to display in a row of tabs, as in the RME default layout
for related items, create a tab set by adding more items to the tab.
3. If you want
to change the order in a row of tabs, see: Move items
around.
4. Click the
tab to highlight it and display the Title
field in the Properties panel. Enter a title for the tab to display on
the page. For a set of tabs, highlight each tab within a tab set to enter
a title as well.
• The
default size of a tab is 12 spaces wide by 3 spaces high in the canvas.
You can change the width to suit.
• You
can add more rows by clicking the green plus +
icon at the bottom. You cannot add more columns.
Add a horizontal line
To add a light grey divider line across the entire width of the page,
go to the Design panel, display the Other
option, and drag-and-drop a Horizontal
Line into an empty line.
• The default
size of a horizontal line is 12 spaces wide by 1 space high in the canvas.
You cannot re-size this line.
Change the width of an item
You can increase or decrease the width of an item after placement on
the canvas.
To change the width, select the field and mouse over the side you want
to change so that an arrow displays. Drag it to a size that will suit
the field data.
• If increasing,
there must be enough empty space next to it.
• If decreasing,
be wary of making the item too small for the data that will be displayed.
Too many small fields will also make the page look very "busy".
Move items around
Select a field or design option (except tabs) and drag-and-drop it to
an empty space in the canvas. You can only move an item into an empty
space that is large enough to fit it. If it is too big for the space you
have in mind, re-size it and then move it. Be mindful of the data that
the field will display.
If you want to move something into the middle of the page, you need
to move other items to make an empty line for it. For example, you can
move everything down to create an empty line and then move the item.
For a series of tabs, select a tab so it is highlighted and drag it
to the position you want to place it in the row (over another tab) and
drop it.

Example: Moving a
tab in a series of tabs
Remove an item
To remove an item from the canvas, click the x
at the top right of it. The item will display under the relevant section
in the Design panel.
When you delete a group box, section or tab group, all fields within
it return to the Design panel. Take care when deleting large groups of
fields. If you make a mistake, you either have to go back to the default,
or reconstruct the group.
Related topics
• Ethics
Category
• Page
Views
• Page
View Fields
Product key:
Modules - Page Layout Designer and Modules - Ethics
Page ID: eth031.htm