In this topic Hide
This page is used to view and manage RME categories, which are groups of items that display in dropdowns for users to select.
Some common category groups and categories are predefined and supplied with RME. For some of these, you can add, edit or delete the category items that display in RME dropdowns. This is denoted by Yes in the Items Allowed? slider for the category.
Some, however, cannot be modified as they are required by the system. For these, the System? slider will be Yes, and the Items Allowed? slider will be No and read-only. For example, Document Types are supplied with RME and cannot be changed because there is interaction with document repositories and validation, whereas for Campus List you can add and delete category items to suit your needs.
Help topic
A generic help topic displays from the Help link for all categories. There is no specific help content to cover each category group, category or item as these are flexible and many can be changed or added for your institution.
The ![]() Source
popup link in field tables throughout online help for core pages identifies
the category used for each dropdown.
Source
popup link in field tables throughout online help for core pages identifies
the category used for each dropdown.
Menu path: RME > Setup > Categories
Categories are shown in the tree structure on the left of the page, in alphabetical order. There can be several levels for a category:
Level 1: Category Group – A logical, predefined collection of categories that is used in a specific area or module in RME; you cannot add, modify or delete category groups. Categories used in more than one module are grouped as Common Categories. Expand by selecting the arrow to the left.
Level 2: Category sub-group – Within a category group, a further grouping to collect similar types of categories together. This isn't always used; categories may be listed directly under a category group. Expand by selecting the arrow to the left. These are optional except for Person Related Categories > Employment Type, where you can only add category sub-groups, then categories.
Level 3: Category – A category for the module that you can select to display the details; appears at the lowest level in the tree. Category items are displayed under the category fields in a grid. These are the actual values offered in the related RME dropdown for selection.
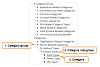
Click to view or hide: Example category tree showing three levels: Group, sub-group and category
1. From the RME menu, select Setup > Categories.
2. Browse the Category Group tree to find the relevant category.
3. Click the category to display the details to the right of the tree. If the group has one or more sub-groups, select one of these until the items are listed.
4. Review or edit the fields, using the table below as a guide.
5. In the toolbar, click Save. To go back to the previous page, click it in the breadcrumb trail or use your browser Back button.
For fields for an open category item, see: Category Items.
Default Field Label (in layout order) |
Description |
Category Code * |
Mandatory Unique code for the category Maximum length: 50 characters |
Category Name * |
Mandatory Name of the category |
Current? |
Yes by default Indicates whether the category is available for use If the category is no longer in use, slide this to No. The category will not be available for selection in core records or eForm templates (in RME Designer), depending on where the category is normally used. |
Description |
Description of the category |
Items Allowed? |
Indicates whether you can add, edit or delete the category items that display in RME dropdowns for the category If this is No and read-only, you cannot edit it or add items (generally used for System fields; see below). If you are viewing a sub-group, where no Category Items table is shown, you can add a category to it by clicking the New button on the toolbar. You can then add items to the category. For example, in Person Related Categories, the Employment Type category group only allows for sub-groups to be added. For each sub-group, you need to add a category, then add items for that category. |
System? |
Indicates whether it is a system category, in which case some fields cannot be modified. You can change editable fields, such as Current? or Category Name, but you cannot change the Category Code, Items Allowed? or System? fields. System categories cannot be deleted as there is a dependency elsewhere in the system. For example, the Document Types category interacts with document repositories and validation so you cannot delete it, whereas you can delete any custom category because there are no dependencies in the system for these. They are used to gather custom information only. |
If category items have been defined, they are shown in a list in the Category Items panel under the category details. If Items Allowed? field for the category is Yes, you can add your own items. See: Category Items
You may be able to manage records, depending on your access and permissions:
Action |
Summary |
More |
Edit |
Open the record, change the details and save. |
|
Delete |
Select the record in the grid and at the top right, click Delete. |
|
Export grid details |
At the top right of the grid, click Export. |
![]() Categories that are provided by default and marked as System cannot be
edited or deleted.
Categories that are provided by default and marked as System cannot be
edited or deleted.
These rules apply where a category is used to populate a dropdown in RME pages or eForms:
• If a dropdown field is set as Mandatory, the option Not Specified is not included in the list.
• If a dropdown was set with a category item value that is later changed to non-current, that non-current item will be retained and display in the list along with all current items for the category.
You can set a default category item so it displays automatically in the dropdown. Users can select a different option from the list if needed (provided the dropdown is configured to be editable).
Core page dropdowns
For core pages, there are two ways to set a default for a dropdown:
a) Mark the category item as Default
= Yes in the Category record (Setup > Categories).
b) Select a category item in the Default
Value dropdown in the field properties in a Page View via the Page
Layout Designer.
(only if you
can access the Page View in the Page Layout Designer; only for dropdowns
with the Category
Group property.)
Core page category precedence:
A default set in the Page View overrides a default defined in the Category
record.
eForm dropdowns
For eForms, only a few dropdowns can be set with a default category item.
For status-type dropdowns, such as Contract Status or Project Status, there are two ways to control how the field is populated:
a) a “Set xxx Status" workflow activity changes the status when executed in the workflow.
b) A default category item can be defined in domain properties in RME Designer (or System Preferences for Ethics).
Status dropdown default precedence: A status set by a workflow activity takes precedence over a default set in domain properties.
Specific eForm
dropdowns: Set a default category
The table below provides a summary of specific eForm dropdown options for setting defaults. For full details, refer to the RME Workflow Designer User Guide.
Area |
Dropdown |
Set a default: Options |
Contract eForms |
Contract Status |
Workflow activity You can set the Contract eForm status at one or more points in the workflow using the workflow activity: Set Contract Status. This overrides any default set in the domain properties. |
Domain properties To set the default category for newly-created Contract eForms, in RME Designer, go to Workflow Designer > Contracts > Configuration > Optional Domain Properties. Select the default in the Default Contract Status dropdown. This is set to Draft by default. |
||
Ethics eForms |
eForm Status (= Application Status) |
Workflow activity You can set the Ethics eForm status category at one or more points in the workflow using the workflow activity: Set eForm Status. This overrides any default set in the domain properties. |
Ethics eForms |
Application Status |
Domain Preferences To set the default status category in newly-created Ethics eForms, go to RME > System > System Preferences > eForms Preferences > Ethics Preferences. Select the default in the Default Application Status dropdown. For example, you may want a new eForm to have the status of Draft. |
Ethics eForms |
Ethics Category |
Domain Preferences To set the default template category for newly-created Ethics eForms, such as Animal Ethics, go to RME > System > System Preferences > Ethics eForm Preferences. Select a category for each template category in the Default Ethics Category dropdown. By default, these are populated by the corresponding ethics category: Animal Ethics for animal ethics eForms, Human Ethics for human ethics eForms and Biosafety for biosafety eForms. |
Ethics |
Ethics categories |
For general categories (as opposed to the template category above) there are two sets of categories used in the Ethics domain: Ethics categories and Ethics-related categories: |
Configure ethics categories in RME > Ethics > Ethics Categories. Identify the ethics category items you need for the Ethics domain, for each ethics eForm template category: animal ethics, human ethics or biosafety, depending on the product keys applied for your institution.
Bear in mind specific settings above for Ethics Category and Application Status. A default set here will not apply to eForm dropdowns. |
||
Ethics-related categories |
Configure ethics-related categories in RME > Setup > Categories > Ethics Related Categories. A default set here will not apply to eForm dropdowns. |
|
Animal Species categories |
Configure animal species in RME > Setup > Categories > Ethics Related Categories > Species (or other categories as relevant). In the Animal RIC in an eForm, the label of the lookup to select a species is Scientific Name by default. You can change this in RME > Global Label Preferences > Animal RIC Species Scientific Name Lookup. A default set here will not apply to eForm dropdowns. |
|
HDR PR eForms |
Progress Review Status
|
Workflow activity You can set the status of an Progress Review eForm at one or more points in the workflow using the workflow activity: Set Progress Review Status. This overrides any default set in the domain properties. |
Domain properties To set the default Progress Review category for newly-created HDR Progress Review eForms, go to Workflow Designer > HDRCM > Configuration > Optional Domain Properties. Select the default in the Default Progress Review Status dropdown. |
||
HDRCM eForms |
Application Status
|
Workflow activity You can set the status of an HDRCM eForm at one or more points in the workflow using the workflow activity: Set Application Status. This overrides any default set in the domain properties. |
Domain properties To set the default category for newly-created HDRCM eForms, go to the Workflow Designer > HDRCM > Configuration > Optional Domain Properties. Select the default in the Default Application Status dropdown. |
||
HDRCM eForms |
Enrolment Status |
Workflow activity You can set the enrolment status in an HDRC eForm at one or more points in the workflow using the workflow activity: Set Enrolment Status. |
Research Outputs |
Record Status |
Workflow activity You can set the record status in a Research Outputs eForm at one or more points in the workflow using the workflow activity: Set Record Status. This overrides any default set in the domain properties. |
Domain properties To set the default category for newly-created Research Output eForms, go to the Workflow Designer > Research Outputs > Configuration > Optional Domain Properties. Select the default in the Default Record Status dropdown. |
||
Research Project Requests (RPR) |
Project Type |
To set the default project type category for RPR eForms, go to RME > Setup > Categories > Project Related Categories > Project Type.
If the Application category item (item code: APP) is marked as Current? = Yes, the Project Type in an RPR eForm will automatically default to that regardless of any category item marked as the default. A category item marked as default will only display if the Application category item is marked as Current? = No. If a default category item is not defined and the Application category item is not current, the Project Type will be blank. The form user will need to select one as this is always a mandatory field (system required) because this category is also used to apply data access security. |
Research Project Requests (RPR) |
Project Status |
Workflow activity You can set the project status in an RPR eForm at one or more points in the workflow using the workflow activity: Set Project Status. Select the default in the Default Project Status dropdown. This overrides any default set in the domain properties. |
Domain properties To set the default status category for newly-created RPR eForms, go to the Workflow Designer > Project Requests > Configuration > Optional Domain Properties. Select the default in the Default Project Status dropdown. |
The category structure to set up salary-related categories for internal salary awards is slightly different to other categories and category items. This supports the Costing and Pricing Tool (CPT). If using Research Costing and Pricing (ReCaP), use the .former structure under Employment Categories > Salary Award Codes.
Under Person Related Categories, Employment Type parent group, you need to set up categories as groups (example: Casual), then set up levels as sub-groups (example: HEW 10), then category items under the sub-group for steps.
Example hierarchical structure in the RME > Setup > Categories page
> Person Related Categories
> Employment Type
> Continuing (or other sub-group)
> HEW10 (or
other HEW level category)
>
Multiple category Items, such as: Step 1, Step 2, Step 3 ...
To set up categories for internal salary awards, follow these steps:
1. Go to RME > Setup > Categories > Person Related Categories and select the Employment Types group. This is the parent group for salary categories. It has been set up as a parent group so that different rates can be set for the same HEW level and step based on employment type. For example, the salary rate at HEW level 10, step 2 for permanent staff (full time /part time) may be different to the rate for casual staff.
2. Under the parent group, two sub-groups are set up by default for Casual and Continuing. You can add new sub-groups under the Employment Type parent group to reflect your salary structure in RME. You cannot add items to these sub-groups, only categories. Go to step 3.
3. The next level down are categories for Higher Education Worker (HEW) levels or other similar level. For any sub-group created under the parent in step 2, add related categories for HEW or other level.
4. For HEW or other level category groups added in step 3, add category items, such as step level, in the grid via the Add option on the top right of the grid. For these items, enter a value the Progression Order for each item to define the order in the salary structure (must be unique for the group, cannot be 0 but can be blank). You cannot create further category groups beyond this level.
API note: If using the RME API - Read Only to extract Person > Employment data, use the EmploymentCategory expansion. For ReCaP, use TypeCategory.
• Ethics (created in the Ethics module): Ethics Categories
• Research Outputs (created in the Research Outputs module): Research Output Categories
• Costing and Pricing Tool: Configure categories related to salary rates
• ReCaP: Configure categories related to salary rates
Product Key: Modules - Core
Page ID: CAT001.htm