In this topic Hide
This help page describes the available widgets for RME dashboards. Widgets are components that are designed to display at-a-glance information on a dashboard displayed on the RME Home page.
Menu path: RME > Session menu (your username at the top right) > Manage Dashboards > Edit mode > Plus symbol (+) in the canvas
Each widget is designed to display a specific type of information. There are a variety of widgets that you can select.
You cannot create your own widgets for RME but you can customise via settings in most of these. Some widgets are static and display the same content to all users, while others are dynamic and show different details based on the role, user or core fields. Some dashboard widgets are interactive and allow you to drill down to view the corresponding core records, provided you have relevant access permissions.
To add widgets:
1. Go to edit
mode in the dashboard: click the Edit
Dashboard icon at the top right of the toolbar ![]() .
If you don't see this, it means you cannot edit dashboards.
.
If you don't see this, it means you cannot edit dashboards.
2. Click the grey plus sign (+) in the dashboard layout. This displays the widget list.
3. Find the widgets you want to add in the list and click the Add widget button next to each.
4. Click Close when you are done. The selected
widgets are added to the dashboard. You can edit the settings for each
widget via the Settings icon,
at the top right, which looks like a cog  . For more,
see: Create a dashboard or the
video. The Edit widget
popup size is flexible, minimum width of 850 pixels. The left side of
the popup is fixed to 200 pixels; if text is longer than this, it wraps.
. For more,
see: Create a dashboard or the
video. The Edit widget
popup size is flexible, minimum width of 850 pixels. The left side of
the popup is fixed to 200 pixels; if text is longer than this, it wraps.
Target audience: Students, researchers, supervisors, examiners, reviewers and RME administrators
Available for: All eForm domains
This widget lists the eForms that a user can open for one selected eForm domain tab. By default, it only shows those currently in progress. If you want to include completed eForm applications in the widget list, change the List completed applications as well? option to Yes.
When added to a dashboard, users can open an eForm application from the widget by clicking the links in blue and underlined.
When you first add the widget to a dashboard, the default is to display eForms from the Research Project Requests - My Applications tab. You can change this.
To change the settings, follow these steps:
1. Go to the
dashboard edit mode: Click Edit Dashboard
![]() in the toolbar.
in the toolbar.
2. Click the
Edit icon at the top right of
the widget .
3. In the Edit settings, you can rename the widget name and select what type of eForms to display based on the domain and either an eForm listing page tab, such as My Applications or For Review, or a saved search. Per widget, you can only display eForms from one domain and tab, or saved search.
4. Change other settings as needed, using the table below as a guide.
5. Click the Save button on the toolbar to save your changes.
Section |
Description |
||||||||||||||||||||||||||||||||||||||||||||||
General |
Default: Application List Title: Header to display on the widget |
||||||||||||||||||||||||||||||||||||||||||||||
Applications |
These fields allow you to customise the widget, as follows:
|
||||||||||||||||||||||||||||||||||||||||||||||
Columns |
Optional; not available if a saved search is selected in the Application group to display field Column order in the widget If nothing is set here, columns will automatically display in the default order of the eForm listing page and tab selected above. • To
change the column order, click the arrow icon on the left of the
column header, then drag-and-drop it to a new location in the
list. The column at the top will be the first column shown in
the widget. • To
delete a column, select the Delete icon (rubbish bin) at
the right. • To add a column not currently displayed, follow these steps: 1. Click the down arrow to the right of the Choose columns to display lookup. 2. Select the checkbox to the left of each column you want displayed. Depending on how many columns are available for the domain and selected tab, there may be more than one page. 3. Click Add. 4. Once added, the list of selected columns will display. Change the order to suit as outlined above. |
||||||||||||||||||||||||||||||||||||||||||||||
Product keys: Widgets - Application List, and relevant eForm domain key/s for eForm data
Target audience: Assessors, contributors, investigators, students, supervisors, committee members, and any person specifically linked to a Significant Event
Available for: Significant Events in main RME core modules: Contracts, Ethics, HDR, Personnel, Projects, Research Outputs and Facilities
This widget can display important events, such as deadlines, milestones or tasks (called Significant Events) for main modules, as well as committee meetings for committee members. It allows you to see your own events, and if supervising, events for your students.
Prerequisites: For a Significant Event to display in the widget in your dashboard, you need to be linked to the Significant Event record in the Responsibility Party field, either specifically or via a group you are a member of, such as a committee. HDR Student Significant Events will only display for students if the Responsible field is defined as Student. HDR Student Significant Events will display in the widget for supervisors by default. For details, see the Events and Modules section in the table below.
You can set up this widget using the fields in the Edit widget popup as follows:
Section |
Description |
||||||||||||||||||
General |
Title to display on the widget, if you want to change it from the default: Calendar |
||||||||||||||||||
Events and Modules |
This section allows you to customise the events to display in the widget:
Supervisors only • Use
the Only show student's events
if I'm the Primary Supervisor slider to show events
for students for which you are the Primary supervisor (Yes), or show events for students
no matter what type of supervisor you are (No
- default). • Student
Events: Exclude events for each student ticked below • Use the Show my own events slider to indicate if you want to include your own events if you have any (Yes - default), or exclude them and only show student events (No).
All users • Module: Exclude events for each module
ticked below
|
||||||||||||||||||
Event Types and Status |
This section allows you to customise the events to display based on type or status, and set colours for displayed statuses: • Event Types: Exclude each type ticked
below • Status: Exclude each status ticked
below • Set the colour used for each status |
||||||||||||||||||
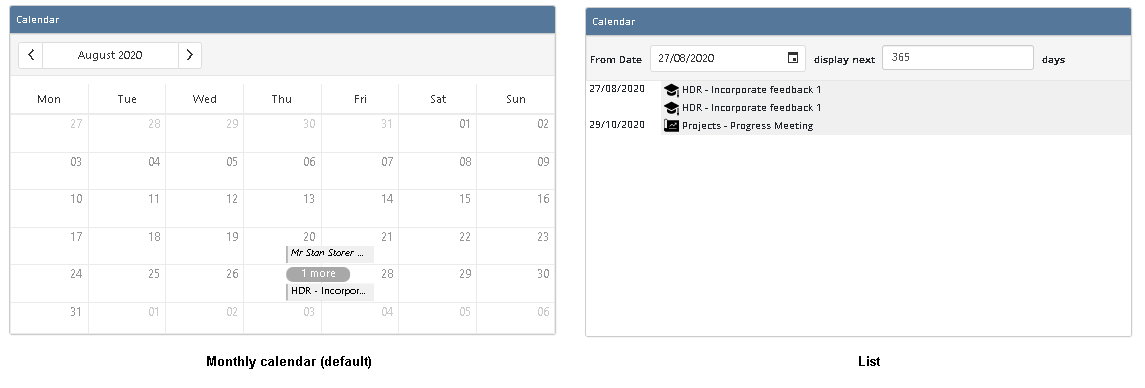
Display Settings |
Display the widget as a list or a monthly calendar • List • Monthly calendar
Examples of monthly calendar and list display options |
||||||||||||||||||
Committee Meetings |
This section is used to configure committee (or panel) meetings Meeting events will only display if you are a current member of a committee or panel that is selected in the Responsibility Party field of the Significant Event record.
Committee Meetings:
Exclude each type ticked below If you leave all un-ticked (default), it will
show meetings for all listed statuses.
Set the colour
used for each status |
* Why "exclude" items in the list?
This may seem a little counter-intuitive, but it is for a reason. The lists for configuration can be automatically refreshed to show the latest details, for example, to show any new people, event types, statuses or modules. If the option was "Include...", any new item would not have been previously configured and would not be displayed in the widget without you knowing. Excluding is a more deliberate action.
Product keys: Widgets - Calendar, and relevant core module key
Target audience: Students, researchers, investigators and RME administrators (anyone who needs to create an eForm)
Available for: All eForm domains
This widget allows you to create a new eForm for the defined domain by selecting an eForm template (type of form). The templates listed will depend on those defined for your role.
For HDR eForms, if you are able to create eForm applications for others, a prompt will allow you to choose the enrolment you wish to submit the eForm for.
When you add this widget to the dashboard, it is blank by default. To choose which eForm templates to display, click the Cog icon at the top right of the widget. The Edit widget popup includes the following sections for configuration:
Section |
Description |
General |
The title to display on the widget, if you want to change it from the default: eForm Templates |
Domain |
Select the domain for the widget, or all: Options: All, Contracts, Ethics, HDRCM, HDR PR, Research Outputs, RPR |
Show descriptions? |
Allows you to control whether to show descriptions of each eForm template in the list (tick), or just show template names (blank, un-ticked) |
Items per page |
Enter the number of items you want listed per page (numeric value only, not text). If not set, it will display five items per page. If the page list is longer than the widget, a scroll bar will display on the right to allow you to view the page. You can also change the number of items displayed per page in the controls at the bottom, right of the page, by selecting a predefined option from the dropdown (5, 10, 20). |
Product keys: Widgets - eForm Templates, and relevant eForm domain key/s for eForm data
Available for: Dashboard notices only; Not related to any core records or eForm domains
Target audience: All users in RME
This noticeboard widget is designed for general communications to all RME users at your institution; it displays the same content for all users.
Administrators: You add the static content in the Custom Content page in RME (RME > System > Custom Content formerly HTML Editor).
Product keys: Widgets - Global Notices
Target audience: Staff from an administrative organisational unit (AOU), which may be referred to as a department, faculty, or school
Details sourced from: Projects core module
This widget shows a summary of an org. unit's funding to provide an at-a-glance view of performance. The widget includes columns for Year and amounts: Applied, Approved, Expense, and Balance, with totals at the bottom of the table.
In the Available Org. Units dropdown, widget users can select one from those available based on data security access defined in their User record.
A Show All Years option displays all the year options. If not enabled, From and To year fields are displayed in which the user can enter years to filter the data.
Calculation rules
• The current and primary org. unit of each project is used for the calculation. If you are using versions for Project records, it will only include the current version in the calculation.
• If the selected org. unit has one or more child units, the child unit data is included.
• All values for a year are added together and shown in one row, together.
• Funding summaries are calculated using all the linked fund scheme records and transaction records.
• Expense and Balance amounts are calculated from project transaction records. The balance is calculated based on the Approved amount less the Expense amount, without GST values.
• Year, Applied and Approved fields are calculated from linked Fund Scheme records.
• When there is more than one version of the Project record, only the latest version is used for the calculation.
Section |
Description |
General |
Title to display on the widget, if you want to change it from the default: Org. Unit Performance Widget |
Project Status |
Used to select one or more project statuses to display in the widget |
Include Projects |
Used to indicate whether to include current projects only, non-current projects only, or both (all) |
Product keys: Widgets - AOU Performance Summary, and Modules - Projects
Target audience: Researchers
Available for: Dashboard notices only; not related to any core records or eForm domains
This noticeboard widget is designed for general communications to all researchers at your institution; it displays the same content for all users.
Administrators: You add the static content in the Custom Content page in RME (RME > System > Custom Content, formerly HTML Editor).
Product key: Widgets - Researcher Notices
Target audience: Researchers, investigators or supervisors
Available for modules: Projects, Research Outputs, or HDR Student core modules
This widget displays a bar chart for the researcher's projects (grants), research outputs and supervision history.
The year range for the data is shown at the bottom left in the From and To fields. To change the year in each, enter a new date or click in the field and select the up or down arrows to scroll through years.
Select what data to display from the checkboxes next to the year range fields from Research Outputs, Grants and Supervision. You can select more than one. The chart displays the following data for each option:
Option |
Data Displayed |
Grants (Projects) |
The total number of current approved projects with a primary fund scheme defined for the entered year range, where the user is current and listed as an Investigator To go to the Projects search page, click the bar chart shaded for Projects. |
Research Outputs |
Total number of current research outputs where the collection year of the output is within the selected year range and the user is listed as an active Author or Contributor To go to the Research Outputs search page, click the bar chart shaded for Research Outputs. |
Supervision |
Number of students who have completed their course in the selected year range and have been under the user’s supervision To go to the Student search page, click the bar chart shaded for Supervision. |
Product keys: Widgets - Researcher Performance Chart, and relevant core module key
Target audience: Researchers, investigators or supervisors
Details sourced from: Projects, Research Outputs, or HDR Student core modules
This widget displays summarised information for researcher's projects (grants), research outputs and supervision history.
At the top right, select the data you want to see in the dropdown, as listed in the table below. You can only view the details of one option at a time.
Select the year range: You can view all data in the system for the researcher (Show all years checkbox ticked), or un-tick this option and define the year range in the Between ... and fields. To change the year in each, enter a new date or click in the field and select the up or down arrows to scroll through years.
For each option the following information is displayed:
Option |
Data Displayed |
Grant Details (Project) |
Financial details of current approved projects with a primary fund scheme that have been awarded in the selected year and where the user is listed as an investigator. The projects are grouped by fund scheme and can be expanded to see the financial details such as Applied and Approved Amounts, Income, Expense and Balance Amounts. When expanded, the link shown in blue for each project displays the Project core record with the latest data. |
Research Output Details |
A summary of research outputs where the collection year is equal to the selected year where the user is listed as an active Author or Contributor The Research Output Category and Title are displayed in the summary. When expanded, the link shown in blue for each research output displays the Research Output core record with the latest data. |
Supervision Details |
List of students who have completed their course in the selected year range and have been under the user’s supervision The student’s Enrolled Course and Thesis Title are displayed in the summary. When expanded, the link shown in blue for each student displays the Student core record with the latest data. |
Product keys: Widgets - Researcher Performance Details, and relevant core module key
Target audience: Office staff, researchers
Details sourced from: Contract and Projects core modules, Significant Event related items
This widget enables users to view high-level information about Project and/or Contract Significant Events involved in research projects.
If your institution uses Financial Significant Event functionality, the widget can be configured to include information about acquittals, deliverables, invoicing and journals from Significant Event records.
You can configure the widget to rename it, select which module/s and event types to include, show or hide field columns, rename columns in the grid, set filters to control what is displayed in the widget, and manage the Bulk Update function. See Configuration options below.
In the widget in a dashboard:
• Data access security is applied to Significant Event data so widget users will only see events to which they have relevant access.
• Users can choose what to display in the widget based on filters along the top, such as by module, event type, action date range, status and invoice status. See Show/Hide Filter and Filter Defaults below.
• Users with special access can update multiple selected events in the widget via the Bulk Update button.
• Details in the widget are read-only but some are linked. Items in the Code or Title columns are linked to open Contract or Project records. Items in the Event Name column are linked to open Significant Event records.
General
This section is used to change the title to display of the widget, if you want to change it from the default: Significant Events.
Significant Events
This section is used to control the events to display in the widget based on module and type.
Option |
Description |
Module |
Default: All Events to display based on module: Contracts and/or Projects Select either both, or just one. |
Significant Event Type |
Default: All types Types of events to display in the widget Select or de-select event types. |
Show/Hide Fields
Default: All fields are shown
This section is used to define which fields from Significant Event records to show in the widget grid, and which to hide.
• To hide a field, click the up/down arrow to the left of the field drag it from the Show Fields section to the Hide Fields section.
• To show a field, click the up/down arrow to the left of the field and drag it from the Hide Fields section to the Show Fields section.
• To change the name of a field, for example so it is more concise to fit in the space, type the alternative in the box next to the field in the list.
Fields (in alphabetical order):
• Action Date
• Code
• Completion Date
• Completion Details
• Completion Notes
• Est. Completion Date
• Event
• Event Details
• Event Name
• Event Type
• Invoice Amount (blank if Event Type is not Invoice)
• Invoice Status
• Module
• Requirements Completed?
• Responsibility
• Responsible Party
• Status
• Title
Show/Hide Filter and Filter Defaults
This section provides controls for the filter dropdowns that are displayed in the widget above the grid, with a setting to select the default/s to display if not hidden.
These filters allow users to select what to view within the Significant Event records available in the widget (based on data access security and what is configured in the Significant Events section above).
Hide Filter? option (in layout order) |
Description |
Default Setting |
Description |
Module |
Default: Not hidden Indicates whether to display the Module filter dropdown in the widget This is only useful if you have selected more than one module in the Significant Events section, Module option. If you have configured the widget to only show events for one module, it might be a good idea to hide this filter dropdown. |
Default Module |
Only displays if the Module Hide Filter flag is No; Default: All To display events for a module by default, preselected in the Module filter dropdown In the widget on a dashboard, users can select a different module from the filter dropdown. |
Event Type |
Default: Not hidden Indicates whether to display the Event Type filter dropdown in the widget |
Default Event Type |
Only displays if the Event Type Hide Filter flag is No; Default: All To display events for one or more event type/s by default, preselected in the Event Type filter dropdown You can select more than one. In the widget on a dashboard, users can select other event types from the filter dropdown. |
Action Date |
Default: Not hidden Indicates whether to display the Action Date filter dropdown in the widget |
Default Action Date |
Only displays if the Action Date Hide Filter flag is No; Default: All To display events for an action date range by default, preselected in the Action Date From and Action Date To filters Options: • Last 7 days • Last 14 days • Last 30 days • Last 90 days • Next 7 days • Next 14 days • Next 30 days • Next 90 days In the widget on a dashboard, users can enter a different date range in Action Date From and Action Date To filters to control the display of event data. |
Status |
Default: Not hidden Indicates whether to display the Status (event) filter dropdown in the widget |
Default Status |
Only displays if the Status Hide Filter flag is No; Default: All To display events for one or more status/es by default, preselected in the Status filter dropdown You can select more than one. In the widget on a dashboard, users can select other statuses from the filter dropdown. |
Invoice Status |
Default: Not hidden Only relevant if the Finance Significant Events function is used Indicates whether to display the Invoice Status filter dropdown in the widget
|
Default Invoice Status |
Only displays if the Invoice Status Hide Filter flag is No; Default: All To display events for one or more invoice status/es by default, preselected in the Invoice Status filter dropdown You can select more than one. In the widget on a dashboard, users can select other invoice statuses from the filter dropdown. |

Example Show/Hide Filter and Filter Defaults configuration for Status
This section is used to manage the Significant Event bulk update function. This function allows widget users to update specific fields in multiple Significant Events from within the widget.
Option |
Description |
Allow Bulk Updates? |
Default: No Controls the bulk update function If Yes, users with defined roles will see the Bulk Update button in the widget and be able to select multiple events to update, based on configuration of the below options. |
Significant Event Fields |
Default: None ticked Check boxes to control the field update options in the Bulk Update popup for widget users Tick the box/es for fields update options you want to display: |
Action Date - used to update the Action Date field in all selected events As this is a mandatory field, users must select an option in the Value dropdown in the Bulk Update popup when updating. |
|
Status (event) - used to update the event Status in all selected events As this is a mandatory field, users must select an option in the Value dropdown in the Bulk Update popup when updating. |
|
Only relevant if the Finance Significant Events function is used Invoice Status - used to update the Invoice Status in all selected events An extra Required checkbox allows you to make this field mandatory so users must select an option in the Value dropdown in the Bulk Update popup when updating (not just "Please select"). |
|
Allow Roles to Bulk Update |
Default: Blank Roles that can use the bulk update feature The multi-select list displays all roles in the system (current and non-current). Users with selected roles will see the Bulk Update button in the widget and be able to select multiple events to update.
Note: The widget only lists Significant Event records they can access based on their data access security and the configuration in the Significant Events section above. This widget configuration will take precedence to Page View access and permissions.
In a rare case that a user has not have been given access to view the core Significant Event records but they have a role that is defined in the widget for bulk update, Significant Event records will still display in the widget (based on data security access for the user) and they can perform a bulk update. They cannot, however, click the link in the widget to view the Significant Event records. A Page Not Found will display as Page View access was not provided. |
Bulk update Significant Events in the widget
To update multiple Significant Events from the widget, follow these steps:
1. Find and select the events to update:
• Apply filters along the top of the widget to search for relevant events.
• Select the box to the left of each event you want to update. To select all, select the box in the header.
• Note that data access security and widget configuration module settings are applied to the widget list.
2. Select the Bulk Update button in the widget toolbar. A Bulk Update popup displays to define the bulk update details.
3. In the Update column, for each field in the Field column that you want to update, change the slider to Yes.
4. In the Action column, select the type of action for each field, either:
• Update Populated or Blank - to populate the field, either if blank/placeholder or by overwriting the existing value
• Update Blank Only - to populate
the new value only if the field value is blank, zero (0), or with placeholders
such as "Please Select" or "Not Specified", to preserve
existing completed details
Note: As Action
Date and Status
(event) are mandatory fields, it is unlikely that either field in a record
is blank. Consider this when choosing an action.
5. In the Value column, select the value to populate each field enabled in step 4 above. Action Date and Status (event) are mandatory fields so you must select an option. If the widget was configured to make the Invoice Status required, you must also select an option (not leave is as Please Select).
6. To start the update, select the Confirm Bulk Update flag, then the Start button. This two-step process is designed to prevent accidental updates. Once you select the Start button, you cannot cancel or reverse the process.
Results: The Bulk Update Status popup shows the progress status. The Status column indicates if the update was processed correctly per event, or if there were issues:
• Updating ...: Records are still in progress; large amounts of data are grouped into chunks to process
• Success: The Significant Event record was successfully updated.
Field updated |
Result/s |
Action Date |
The Action Date field in the Significant Event record is populated with the defined new value (depending on the Action setting - see step 4 above) |
Status (event) |
The Status field in the Significant Event record is populated with the defined new value (depending on the Action setting - see step 4 above) • If changed to Completed, the Completed Date in updated Significant Event records is set to the date of the update. • For recurring Significant Events, only the selected records are updated, not other occurrences. |
Invoice Status |
Only if Finance Significant Events functionality is used The Invoice Status field in the Significant Event record is populated with the defined new value (depending on the Action setting - see step 4 above) |
• Failed: A value entered to update
the field is not in the right format, is invalid, has a conflict with
another field, or is blank
To rectify this, click the item to display an explanation of the problem.
Click Back to return to the Bulk
Update popup, fix the issue, and repeat from step 6.
• Error: Records were not updated
due to a technical disruption, such as a server failure, or HTTP errors
Click the item to display an explanation of the problem. You could wait
for a while and try again, or contact your IT Administrator for assistance.
Product keys: Modules - Contracts and Projects, and Dashboard Widgets - Significant Events (and for Invoice Status, Modules - Finance Significant Events)
Target audience: Students
Details sourced from: HDR Student core module
This widget is designed to allow HDR Students to view their own general details in the RME Home page. This is useful if students are not given access to their Student record. Information that is always displayed in this widget includes: Student's preferred full name, ID, ORCID iD, course (current and primary course), and thesis title. You can optionally configure it to display the photo from the Student record, the student's supervisors and key dates.
To make this widget available to students, include it in a dashboard that is specifically assigned to HDR Student roles in the Allow roles to view this dashboard option. See: Create a dashboard
Section |
Description |
||||||||||||||
General |
The title to display on the widget, if you want to change it from the default: Student Details |
||||||||||||||
Show/Hide sections |
These fields allows you to customise the widget, as follows:
|
||||||||||||||
RME administrators can additionally create and customise key date fields and field labels in the Page View for this widget (Student Details Widget DAS002).
Product keys: Widgets - Student Details, and Modules - HDR Candidates
Target audience: Students
Details partially sourced from/updated in: HDR Student record, Student Leave Details related item
This interactive widget can be used by HDR students to manage their
leave.
They can view approved leave not yet completed, and update leave
details on their return. Items in the widget can be filtered by
course, based on those undertaken by the student, or leave type (![]() Source).
If there are no active leave records, the widget displays a message
to this effect: "You currently have no upcoming approved leave."
Source).
If there are no active leave records, the widget displays a message
to this effect: "You currently have no upcoming approved leave."
Widget users can filter the leave records that display by course and leave type. All courses and leave types that apply for the student are displayed by default. Read-only fields that display approved leave details are sourced from the HDR Student record, Student Leave Details (in alphabetical order): Approved, Commencement Date, Course Code, Est. Completion, and Leave Type.
When a student returns from leave, they can open the widget and select Edit for the leave entry to enter completion details. An editing popup displays in which they mark the Completed flag as Yes, then complete the Actual Completion field, and optionally, Completion Notes. The Actual Completion date field is validated to ensure that it is later than the Commencement Date and no later than today's date (determined by the system date). When saved, entered details will be populated in the Student record, Student Leave Details related item to keep information current. Dates are validated as for the Student Leave Details related item, for example, the Actual Completion date cannot be earlier than the Commencement Date.
To make this widget available to students, include it in a dashboard that is specifically assigned to HDR Student roles in the Allow roles to view this dashboard option. See: Create a dashboard
Section |
Description |
General |
The title to display on the widget, if you want to change it from the default: Student Leave Details |
Columns |
Order of the columns to display in the widget (you cannot delete any columns): To change the order, drag and drop column names within the list. Use your mouse control to select the arrow icons at the start of each name. |
Product keys: Dashboard Widgets - Student Leave Details, and Modules - HDR Candidates
Target audience: Students
Available for: Dashboard notices only; not related to any core records or eForm domains
This noticeboard widget is designed for general communications to all students at your institution.
Administrators: You can add custom content in the Custom Content page in RME (RME > System > Custom Content formerly HTML Editor) and can insert Census Date fields to this widget to remind students about submission due dates (if used).
Product key: Widgets - Student Notices
Target audience: Students
Details sourced from: HDR Student core module
This widget gives HDR students the ability to view their own course progress as a graph, drawn from the HDR Student module.
The graph shows the following, shaded according to the legend at the top:
• Funded period
• Minimum and maximum course duration
• Prior load
• Consumed load
• Full course duration (blue)
The Details section below the graph shows events, such as leave, thesis submissions, extensions and expected completion. These are represented on the graph by triangle markers. To identify a marker, click it on the graph and the related detail will be shown in red.
Click to view or hide: Example student widget
Product keys: Widgets - Student Progress,, and Modules - HDR Candidates
Target audience: HDR administrators
Details sourced from: HDR Student core module
This widget provides details for all current upcoming and overdue thesis submissions based on the expected completion date, filtered by the administrator's data access security. This allows administrators to plan thesis and course completion activities.
Users can filter the details in the widget by AOU, Course and Supervisor, as well as completion period (From and To). They can also sort the data in the columns. When they select a Student record in the widget, the enrolment record opens. They can then move to the previous or next record from the opened enrolment page.
Section |
Description |
||||||||||||||||||||||||||
General |
Title to display on the widget, if you want to change it from the default: Student Thesis Submission Summary |
||||||||||||||||||||||||||
Show/Hide Fields |
To customise the widget, drag-and-drop the fields you want to show or hide as columns • To display a field that is not already in this list, drag and drop it from the Hide Fields list into the top Show Fields section. You can change the order of fields by dragging and dropping fields within the list. • To hide a field so it does not display in the widget, drag and drop it from the Show Fields list into the Hide Fields section.
Available fields Details for the fields available for this widget are sourced from the HDR Student record, as follows:
|
||||||||||||||||||||||||||
Overdue Students |
Settings to configure the display of students with overdue thesis submission in the widget:
|
||||||||||||||||||||||||||
Show/Hide Filters |
Default: No, to show all filters You can show or hide different filters in the widget, which users can then use to filter the student details. To display a filter in the widget, select No. For each filter you want to hide, select Yes. Available filters are:
|
Product keys: Widgets - Student Course Completion Summary, and Modules - HDR Candidates
Target audience: Supervisors
Details sourced from: HDR Student core module
This widget gives supervisors the ability to view the progress of current students they are actively supervising by a series of graphs, one per student. Data is drawn from the HDR Student module.
When supervisors add this widget to a dashboard, it lists all current, in-progress students for which they are actively supervising the primary course. Only the current and primary course details are displayed.
Users can expand each student for more details, as follows:
• A graph shows the following, shaded according to the legend at the top (similar to the graph in the Student Progress widget above):
• Funded period
• Minimum and maximum course duration
• Prior load
• Consumed load
• A timeline shows key dates for the course.
• The Details section below the timeline list the key dates, depending on what dates are available for the student, sorted by start/from date in ascending order:
• Course Start Date
• Expected Completion
• Funded Extension
• Gov. Funded Completion
• Leave (from and to dates)
• Minimum Completion
• Study Mode (changes)
• Thesis Submitted
• Thesis Returned
Product keys: Widgets - Supervision, and Modules - HDR Candidates
The matrix below lists all widgets and indicates their intended audience/s:
Widget |
eForm users |
HDR Students |
Supervisors |
Researchers/ |
Administrators |
Application List |
Yes |
Yes |
Yes |
Yes |
Yes |
Calendar |
|
Yes |
Yes |
Yes |
|
eForm Templates |
Yes |
Yes |
Yes |
Yes |
|
Global Notices |
Yes |
Yes |
Yes |
Yes |
Yes |
Org. Unit Performance Details |
|
|
|
|
Yes |
Researcher Notices |
|
|
|
Yes |
|
Researcher Performance Chart |
|
|
Yes |
Yes |
|
Researcher Performance Details |
|
|
Yes |
Yes |
|
Significant Events |
|
|
|
Yes |
Yes |
Student Thesis Submission Summary |
|
|
|
|
Yes |
Student Details |
|
Yes |
|
|
|
Student Leave Details |
|
Yes |
|
|
|
Student Notices |
|
Yes |
|
|
|
Student Progress |
|
Yes |
|
|
|
Supervision |
|
|
Yes |
|
|
• Home
Product keys: Each widget has a separate product key. To see which widgets are available for you, check the Product Key page.
ID: Dashboard_widgets.htm